This walkthru gives explicit instructions for playing Star Trek
The Next Generation: A Final Unity (FU) that lead to a successful
conclusion. The information given here assumes that the player
has read the game documentation included in the FU game box and
readme.txt.
Instructions are given for the Captain mode of difficulty. However,
it assumes you delegate all Tactical responsibilities to Worf
and Engineering responsiblities to La Forge or are able to manage
these activities yourself.
- Act cooperatively whenever there is an opportunity.
- Never surrender to an enemy.
- You can defeat one Romulan warbird easily, but not three.
Avoid the latter battle!
- Question exhaustively. That is, do not end the conversation
prematurely. Select all the alternative questions and statements
before selecting the end of conversation statement. The exception
to this is Admiral Williams (Communication with Starfleet Command),
who will only provide new information only after you complete
each assignment.
- Never ignore a hail. (You may do so during battles.)
- Set course for the nearest Starbase to replenish Photon Torpedoes.
There are two starbases. Starbase 131 is in sector 01-03-01. Resume
your original course or return to your original location. Try
to time this so you are between assignments so as not to fail
a mission.
- Save the game at every opportunity. There are four main reasons:
- You can lose the ship & crew in battle.
- I found the game crashed frequently and unpredictably.
- It is easy to get stuck after having performed the wrong action.
- You may complete the assignment, but when you check with Starfleet
they are not completely happy with your performance. You will
probably want to try again to do better.
The Enterprise has intercepted a Garidian Warbird chasing a Garidian
Scoutship. The occupants of Scoutship request that the Enterprise
rescue them.
Enjoy the intro!
Picard enters the details into the ship's log. Talk to Data and
follow up on his suggestion.
Accept the hail. Converse (and fight) with the Garidian captain
until the Warbird leaves.
It doesn't matter whether you stay put or continue patrolling.
Click on the conference lounge door and speak to T'Bak. Accept
the mission to Horst III to visit Shanok. Picard will set course
for Horst III.
Before the ship arrives, a message comes in from Cymkoe IV. Accept
the message and you will hear about an attack on Mertens Orbital
Station. Picard will decide to head for the station.
On arrival, Picard studies the station and discusses the situation
with the crew. Data discovers a way to locate transporter co-ordinates
on the station.
Go to the transporter room. The away team should be Riker, Worf,
Dr. Crusher and La Forge. The inventory should contain Phaser,
Tricorder, Medical Tricorder and Medi-Kit. Energize.
You arrive in the station's Transporter Room. Leave the room via
the door on left. Walk to the big cable and use the phaser, on
its lowest setting, on the cable. Consult Dr. Crusher then La
Forge. Use the tricorder on the cable. Return to the transporter
room. Use the transporter panel. Press the blue lock-on
button and select the Data Cable target. Press the yellow
Energize button. The cable will appear in the transporter.
Return to the injured woman. Have Dr. Crusher use the med-kit
on the woman. Talk to the woman until she tells you the security
code you will need to stabilize the station's life support system.
Walk right and walk to the turbolift. Select the Administration
level. Use the control panel on the right. Press the emergency
systems button. Press the power redirect button. Exit
the control panel. Walk to the turbolift. Select the Engineering
level.
Have La Forge use the tricorder on the strange machine. Press
Resume on the tricorder. La Forge will discover that the
machine generates a field to disguise itself. This is the Chameleon
Field. He will re-calibrate the tricorder and use it on the machine
again. Press Resume on the tricorder. Walk to Engineering
Lab 4.
Have Riker talk to La Forge. After a few moments La Forge will
suggest switching off the power to the conduit. Have La Forge
use the control panel near door. Press the Initiate Temporary
Shutdown button. Press Shut Down Group 3 button. When
La Forge speaks to the Enterprise, ask them to chase the device
down.
Pick up the Flux Router, the Invertor Coupling and
the Wave Convertor from the equipment cart. Return to Engineering.
Use the Turbolift. Select the Administration Level. Have
La Forge use the Flux Router on the Holotable. Have La
Forge look at the hologram. Return to Engineering via the turbolift.
Walk left to the Core Control Room. Have La Forge talk to Dr.
Griems until La Forge offers to fix the conduit.
Have La Forge use the Invertor Coupling, then the Wave
Converter on the Hole In Casing.
This mission is complete so now you can resume course to Horst
III.
On arrival at Horst III select Picard's Comms button and
select Shanok.
Talk with Shanok until he tells you that he has some samples being
analysed at Merton Station and you have discussed the Fifth Scroll.
Do not leave. Select the Comms button and select Chancellor
Daenub.
After conversing with the Chancellor wait a few moments and you
will receive a communication from Starfleet. Picard will set course
for Morassia.
On arrival at Morassia, Picard converses with Constable Lliksze.
Agree that the away team will not carry weapons.
Go to the transporter room. The away team should be Data, Worf,
Dr. Crusher and Troi. The inventory should contain Tricorder,
Medical Tricorder and Medi-Kit. Energize.
Data will talk to the Constable. Walk to the doorway on the left.
Walk to the Laboratory.
Pick up the Bioprobe from the Biotable. Pick up three Field
Units (A, B and C). Pick up any of the three carcasses. Put
the carcass on the Biotable then under the sonic scope. Put the
carcass down. Repeat the same process with the other two carcasses.
Use the Tricorder on the computer on the right. Use the tricorder
on the Comms Port near the computer. Open a channel to Tracker
Melas.
Return to the Constable's Office and talk to her.
Leave and walk to the Crossroads. Then walk to the Shuttle Dock.
Get the Microgenerator. Walk to the path and then take
the path to the Bogforest Biotope.
Use the Microgenerator on the power port below the screen
on right. After the layout of the biotope is explained, remove
the Microgenerator. Use Field Unit B on Tunnel 1.
When the Field Unit returns, use the Bioprobe on it. A
sample will appear in the inventory. Repeat this process for Tunnels
2, 3 and 4. You will now have four samples in the inventory.
Return to the Laboratory.
Place each of the four samples under the Sonic Scope.
Walk to the Marine Biotope. Follow the same procedure as in the
Bogforest. Use Field Unit C on the four nearest Jellycorals.
You will now have four samples in the inventory. Return
to the Laboratory.
Place each of the four samples under the Sonic Scope.
Walk to the Canyon Biotope. Follow the same procedure as in Bogforest.
Use Field Unit A on the caverns, pit and crater. You will
now have three samples in the inventory.
Return to the Laboratory.
Place each of the three samples under the Sonic Scope.
Use the Tricorder on the Comms Port and open a channel to Consultant
Iydia then Healer Zzolis.
Walk to the Quarantine Shelter. Talk to Watcher Tzudan.
Return to the Constable's Office.
Talk to the Constable. The Constable will leave. Wait for her
return.
She will use the computer, then Dr. Hyunh-Foertsch appears. After
talking with her, you will need to go to the Power Grid. Return
to the Shuttle Dock.
Wlat to the Shuttle and the Away Team will be taken to the Power
Grid.
Use the Utilities Trunk then walk to the exit at the front
left.
Back at the Quarantine Shelter, talk to Doctor Hyunh-Foertsch.
She will instruct you as to how to use the consoles. Use Console
2. Talk to Doctor Hyunh-Foertsch. Use Console 1. Talk
to Doctor Hyunh-Foertsch. Use Console 3. The creature is
captured.
This mission is complete.
After talking with T'bak, Picard sets off in pursuit of the Ferengi
trader. He sets course for the Nigold System on advice from the
crew.
When the Enterprise has reached the specified co-ordinates, put
the shields up, fire a warning shot and talk with the Ferengi.
Ferengi Trader Aramut will negotiate a deal for information regarding
the Romulans. Picard will set course for Shonoisho Epsilon VI,
also known as Frigis.
Talk to Troi. Select the Conference Lounge and talk to T'Bak.
After T'Bak has recited the Lawgivers Lament, wait for communication
from Frigis.
Talk with the Chancellor, await his response then go to the Transporter
Room.
The away team should be Riker, Data, La Forge and Troi. The inventory
should contain Phaser and Tricorder. Energize.
On arrival talk to Chancellor Laraq.
Enter the doorway to the nearest Pyramid and you arrive in the
Chanters Hall. Talk to Stamblyr. You will be given an Orchestrion
by Stamblyr. Talk to Stamblyr again. Leave via the bottom left
of the screen.
Walk right to the desert and enter the pyramid. You arrive in
the Seekers Building. Talk to Nachyl. Walk to the Arch and walk
to the door. The Gatekeeper will awaken and ask you his questions.
Respond as if you are very unsure of yourself in every case. If
the Gatekeeper is satisfied with your answers the door will open.
Enter the temple. Look at the panel and at the sign.
Have Data look at the Stasis Field, the panel and
the sign. Have Riker talk to Data. Leave the temple, and
return to the Hall of Triumph. Leave the Seekers Building at the
bottom of the screen. Return to the Landing Area.
Talk to Laraq. He will download a means of translating the language
on the panel in the Temple into the Tricorder.
Return to the Temple. Have Data use the Tricorder on the sign.
Have Data use the panel. Aelont will now be free of the
stasis field. Have Riker talk to Aelont. Aelont will give Riker
two talismans and a key to the Vault. Leave the
temple and go to the Vault in the Hall of Triumph. Use the
Thermacode Key on the Vault. Take the Golden Ring,
Device, and Staff with the ball of light. Exit the
Vault.
Return to first pyramid and enter the Chanters Hall. Use the Gold
Ring on the hole. Stamblyr will give you a four pronged
orchestrion which plays "Watch Your Step". Have
La Forge use the Device on the Instrument. Stamblyr will
give you a two pronged orchestrion which plays "Traveling
Music". Leave at the bottom of the screen.
Walk to the Pyramid near the volcanoes toward the top of the screen.
Enter the Temple of Inner Strength. Have Riker talk to Madia.
Use the Staff on Madia. Ask Madia what is behind the force
field and Madia will lower it. Use the two pronged orchestrion
on the transporter. The away team is transported to the Platform
Room.
I have included a 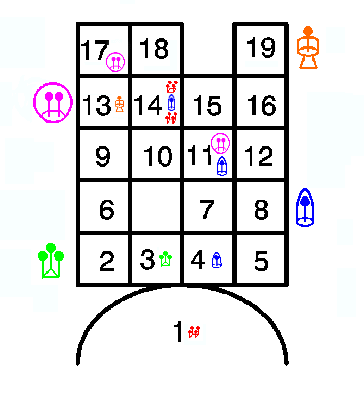 map of the platforms .
The instructions that follow make reference to the platforms by
number according to the map.
Save!
Make your way from platform 1 to platform 18 following the instructions
below in sequence:
  Go to     Use Orchestrion  Pick up Orchestrion
Platform:       with:              with:

     -          4 Prongs              -

     2             -               3 Prongs

     3          3 Prongs              -

     8             -           1 Covered Prong

     4      1 Covered Prong           -

    14          4 Prongs              -

    13             -           2 Covered Prongs

    14      1 Covered Prong           -

    11         2 Covered              -
                 Prongs

    19             -               1 Prong

    11      1 Covered Prong           -

    14          4 Prongs              -

    13          1 Prong               -

    17         2 Covered              -
                 Prongs

    18             -                  -
At platform 18, you should be standing beneath the Niche. Use
the blue Talisman on the Niche and you are transported
to the Scroll Room. Pick up the Manuscript.
The mission is complete. You have recovered the Fifth Scroll
so the Garidian refugees will transport to the Garidian Warbird.
Have Picard consider the situation and wait for a few moments.
So the Romulans have declared war on the Federation! Attempt to
contact Starfleet. Initially you will be unsuccessful but Worf
will keep trying and eventually makes contact.
Picard sets course for Outpost 543.
On arrival at outpost use the Comms to contact Commander
Chan.
You will be instructed to go to the aid of a Communications Relay
Station.
Accept the mission. Picard will set course, as instructed. On
arrival Worf will detect three Romulan Warbirds. Have Worf prepare
to engage the warbirds and they will retreat. Change course to
intercept them.
One warbird will attack. After being attacked by the Enterprise,
the warbird initiates self-destruct. Contact Commander Chan via
the Comms. Picard will be given another assignment.
His request for repairs is turned down and he is ordered to help
the Klingons against an attack by three Warbirds. Picard will
set course for Goldur Epsilon.
(At some point soon, Worf will detect a Romulan vessel. Intercept
the target and destroy it.)
Talk with the Klingon captain. Picard will then discuss the situation
with the crew.
Contact Commander Chan via the Comms. Picard will give
his report and then receive a signal from Starfleet and lay in
a course for Shonoisho Epsilon 6 or Frigis.
You will receive a message from Chancellor Laraq. Continue on
course to Frigis and you will encounter a Romulan Warbird. Destroy
it. Picard now wants to beam down to Frigis.
Go to the transporter room. The away team should be Picard, Data,
Worf and Troi. The inventory should contain Phaser and Tricorder.
Energize.
Have Picard speak to Laraq about the Ancient Chodak. Laraq will
give the Isolinear Encryption Rod, the Programming Tool
for the Rod and a Chodak Data Crystal to Picard.
The away team will return to the Enterprise and Picard should
set course for Horst III.
Data will complete an analysis of the Chodak Data Crystal.
On arrival at Horst III Picard will receive an automatic message
transmitted by Shanok.
Go to the Transporter Room. The away team should be Picard, Data,
La Forge and Troi. The inventory should contain Phaser and Tricorder,
the Isolinear Encryption Rod and the Programming Tool. Energize.
Set the Phaser to its highest setting and fire it at the rubble.
Walk to the passageway. Use the Screen. Put the Isolinear Rod
in the Aperture. Put the Programmer on the Rod.
Use the Tricorder on the Screen. Remove the Rod and exit
the Screen.
Walk left to the Rear of the Site. Use the Tricorder on the Instrument,
then on the Instrument Mounting. Walk right to the Main Area.
Walk right to the Access Shaft. Hail the Enterprise via the Comm
Badge. The mission is complete
Wait a few moments and Worf will receive a message from Starfleet.
Picard is instructed to intercept an unknown alien vessel located
in the Yajj system.
Picard will set course as instructed.
Save!
After destroying the alien vessel Picard will discuss the encounter
with crew.
Have Picard talk to Data and Picard will set course for Allanor.
On arrival at Allanor, Data will find a transporter point below
the surface of Allanor. Go to the Transporter Room. The away team
should be Picard, La Forge, Data and Carlstrom. The inventory
should contain the Phase, Tricorder, Med-Kit, Rod and the Rod
Programmer. Energize.
Use the Tricorder on the Schedule Screen at the back of the room.
Set the Phaser to at least setting 8. Use the Phaser on each of
the three Alloy Seals of the Ventilation Duct at the front
right. When the Ventilation Duct opens, walk through it.
In the next room use the Display Panels at the top of stairs at
the right of screen. Use the Rod on the Port at
the bottom right. Use the Programmer on the Rod.
The Computer will display a menu with three options. Select System
Log then More. Select Done when La Forge and
Picard have finished studying the information.
You will be returned to the Main Menu. Select Initialize System
then OK. Wait for a menu displaying Activate Facility
and Exit. Select Activate Facility.
Wait. You will be returned to the Main Menu. Select Access
Database. Select OK.
Wait. Select Dispatch Repair Unit. Wait. You will be returned
to the Main Menu.
Remove the Isolinear Rod and you will leave Control Panel.
Walk to the Passage on the right.
You should now be in the Drone Repair Area. Pick up the Sheet
of Metal on right of screen. The Sheet of Metal and
a Paperclip will appear in the inventory. You will witness
a Drone being repaired. Data will discover how to deactivate the
Drones. Return to the walkway on the left. Return to the Ventilation
Duct on left. You will now be back at the Beam Down point.
Remove the Foreign Object, Logic Inhibitor, from the deactivated
drone. The drone will reactivate. Use the Tricorder on the Drone
immediately to deactivate it. This is a Security Drone
which will confiscate your weapons if not deactivated. You will
now have the Logic Inhibitor in your inventory. Return
to the Drone Repair Area by walking two screens to the right.
Walk to door at the far rear.
You will now be in a location featuring a large, round door that
automatically opens on the Drone's approach. This door will close
after the Drone goes through the door. Have Data use the Tricorder
on the Alien Device just below the Door. A schematic diagram
of the door mechanism will appear on the Tricorder display indicating
the location of the Logic Circuitry for door. Select Resume.
Place the Logic Inhibitor on the Door Circuits
to the left of door. This will stop the door from automatically
opening. When the next Drone approaches it will stop. Use the
Tricorder on the Drone and select Deactivate. Remove the
Logic Inhibitor from logic circuitry. The Door will now
open allowing access to the next room. Walk to the Door. The Logic
Inhibitor will be replaced to prevent it from closing again.
You are now in the Drone Charging Area. Have La Forge use the
Display Panel near the Away Team's point of entry. Insert the
Rod in the Port. Place the Programmer on the Rod.
The Display will be activated. Two options are offered: Power
Off and Station Offline. Select Power Off. Power
On will display. Select Station Offline. Station
On Line will display. Exit the Panel. The Charging Unit will
now be back in operation.
Green lights will illuminate on the side of the Charging Capacitor.
Use the Display Panel again. Insert the Rod in the Port.
Place the Programmer on the Rod. Select Power
On. Power Off will display. Exit the Panel. Drones
will continue to be charged thus decreasing the charge in the
Capacitor. When the Capacitor is down to one green light, fire
the Phaser at the Capacitor. The Charging Machine will be destroyed.
Try walking past the Charging Machine. Wait. The Chodak will appear.
Follow the Chodak to the next location when invited to do so.Have
Picard talk to the Chodak on the far right. Claim to be in on
a peaceful archaeological mission. Do not tell the Chodak you
have an encryption rod.
The Chodak will take you to the Hall of Records.
(If the conversation above goes differently, you may end up surrendering
or fighting. No matter what choices you make you will end up at
the Hall of Records.)
Use the Rod on the Computer (if the Chodak have not done
so).
You will learn information concerning the Unity Device.
The Chodak will eventually leave. Look at the Pedestal. The computer
is still active. Select Exhibit 227. Select View.
Read the Document. Select Done on completion. Select Final
Message. Select View. Listen and read the Document.
Select End of Transmission on completion. Select Communiqué
763-r. Select View. Select Done on completion.
Exit the Panel.
Walk to the back of this location.
At the new location you will witness the departure of the Chodak.
Use the Med-Kit on the dead Optimator. Have Picard talk to the
injured Optimator twice. Data will synthesize a stimulant for
the Optimator. A Stimulant will appear in inventory. Use
the Stimulant on the injured Optimator. Picard will be
given a security code by the Optimator.
Use the Security Panel near the injured Optimator. Insert the
Wire Loop (paperclip) into the hole left of the
rod. The Security Rod will appear in the Inventory. Use
the Security Rod on the Port. Select all six buttons
on the screen display to deactivate the security system. Exit
the Panel.
Walk to the Stairs at the top left. Walk Left. Walk to the Hall
at the back of the screen. You are now in the Chodak Transporter
Room. Use the Panel. This is the Control Panel for the Transporter.
Use the Middle Button at the left. Use the Right Button
at the top. Use the Engage Button on the bottom right.
The Transporter will activate and the three Away Team members
displayed on the screen will be transported. Use the Bar Gauge
(timer) on right of screen. Exit the Panel.
Walk to the Transporter. The last member of Away Team will be
transported. The entire Away Team will appear at new location.
Walk to the Door at the front left. The Away Team is back at the
location where Picard first met the Chodak Admiral.
Walk to the Charging Station to the left. Walk to the passage
at the bottom left. Walk to the Chamber at the bottom left. Walk
to the Walkway to the left. Walk to the Ventilation Duct to the
left.
The Away Team has returned to the Beam Down location. Wait. One
of the Away Team will study the screen and Data will propose calculating
the possible location of the Nebula.
Hail the Enterprise via the Comms Badge.
This mission is complete.
Back on the Enterprise Picard will discuss the gathered information
with rest of crew. Return to Federation Space.
Have Picard talk to Troi, then Data, then lay in a course for
the Gambara Pulsar.
On arrival Data advises Picard that the Pulsar has collapsed into
a Black Hole thirty years previously. Talk to Troi again and she
will suggest taking the Enterprise thirty light years from the
present location to view the light from the Pulsar.
Select Astrogation. Select Sector Map (cube). Set a heading of
06-05-06 (Zephyrus Sector). Select Course. Engage.
On arrival Enterprise will probably encounter Warbird at this
location. On destroying any resistance, select Astrogation. Select
Stellar Map (middle button). Set a Stellar Heading of 03-08-12.
Select Course. Engage.
On arrival Data will detect a light reading from Pulsar, as planned.
Data will tell Picard that the Unity Device is in Sector 03-01-03.
Select Astrogation. Select Sector Map (cube). Set a heading of
03-01-03 and engage.
On arrival in Thang Sector the Enterprise is likely to encounter
heavy resistance before reaching destination.
Select Astrogation. Select Stellar Map (middle button). Set a
heading of 09-14-16 and engage.
The Enterprise has arrived at the Unity Device. Picard will give
the order to approach the Unity Device. The crew discusses their
observations of the Unity Device and assesses the situation. The
Garidian Warbird arrives and hails the Enterprise. On completing
the conversation with Garidian Captain, wait. The Chodak Dreadnought
arrives and hails the Enterprise. On completion of the conversation
the Chodak Dreadnought prepares to attack.
Have Picard select Evasive Maneuvers and wait.
The Chodak Dreadnought will not attack. Both the Chodak and the
Garidians send shuttles down to the surface of the Unity Device.
Picard does the same.
The away team should be Picard, Data, Worf and Butler The inventory
should contain Phaser and Tricorder.
On arrival walk to the Interior Bay on the right. Get Worf to
walk to the circular platform in middle of screen. This is a transporter
pad. Send Worf through the transporter first.
Have each member of the away team step onto the transporter pad
individually, Picard going last.
Only Picard will arrive at the new location. Have Picard look
at the Glow on the left. Walk to the left. The alien does not
respond to Picard. Walk to the Left.
Picard meets Brodnack and Pentara, and discusses the situation
with them. Walk to the shuttle. Their conversation continues as
they travel to the control center.
Agree to the alliance with Pentara
Walk to left-most (center screen) door. Picard will be met by
a Picard from the future and given an Artifact. Do not
admit this to the others.
Speak to Brodnack and you will be told of the second Test. Picard
will pick up the semi-circular blocks. Picard goes first
with test. Use Table. Use Disk Half on Left Receptacle.
Use Button Pentara goes second. Brodnack goes third.
Picard's turn: Use Table. Use Button. Pentara and Brodnack take
their turns. Picard talks to Brodnack so that Brodnack decides
to co-operate with Picard and Pentara.
Have Picard pick up Disk Half from Table. Get Picard to
examine Field Generator. Use Disk Half on Disk Half
to create a complete Disk. Use Disk on (lower) air
gap. Look at Field Emitter at the top. Look at the upper air gap.
Look at the Field Coil. Look at the lower air gap. Look at the
Disk. Exit Field Generator. Picard will ask for the other
four Disk Halves from Pentara and Brodnack.
Assemble two complete Disks. Examine Field Generator. Insert
both Disks into lower air gap above the first Disk.
The Force Field will be deactivated. Exit the Field Generator.
Walk to the right. Have Picard use the Artifact. He will
be transported across the chasm. Use the Artifact twice
more to transport Brodnack and Pentara. Pick up the Symbol.
The Force Field in the Doorway will be deactivated.
Walk to the Doorway. Use the Symbol on the lower right
Door. The Door will open. Walk through the open Door. Walk to
the Stasis Chamber. Look at the Stasis Chamber. Use the Panel
to the right of the Stasis Chamber. The Judge will come out of
stasis and talk to each of the candidates.
Have Picard say that the Unity Device should be used for the good
of all.
The Judge will interrogate each of the candidates. Once he is
satisfied he will open the Door. Walk to the right. Walk to the
Tower. This will take the candidates to the Unity Device Intelligence.
The Unity Device will claim all candidates have passed the tests.
The Unity Device will detect a Borg Invasion Fleet and offers
the candidates the opportunity to take action against the Borg.
This is another test. A Control Panel will appear.
Have Picard deactivate the Panel, without making a choice. Picard
will then explain his actions.
Now, sit back, relax and enjoy the exciting end sequence!
STAR TREK THE NEXT GENERATION: A FINAL
UNITY is published and distributed by Spectrum Holobyte, Inc.
This walkthrough is copyright (c) 1995 by Diana Griffiths.
All rights reserved. Not to be distributed without permission.
References
Letters
Please send us your comments and suggestions.


