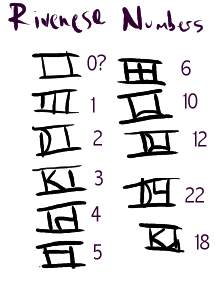
This is the Rivenese Number system. There are four basic characters. All characters are inside what looks like a really spaced-out roman numeral 2 - that's the one labeled '0?', just because I've never seen it, and don't know if it's a real Rivenese Number. The basic symbols are 1, 2, 3, and 4, labeled above. The cool/tricky part comes when you need to go above 4. When you rotate a basic digit 90 degrees, you multiply the value by 5. So, 5 in the Rivenese number system is just one, rotated - likewise, 10 is just 2, rotated. Then, if you want, say, 6, you just overlay the regular character with the rotated one (see the diagram). The other numbers follow the same patterns. To my knowledge, you can only have two overlayed characters in the same base frame (although you can put two frames side by side if you need higher numbers - see the numbers on Ghen's linking books for an example)
Big Dome Island
After the animation, leave the cage and look over the side of the cliff on your
right. The guy that got hit with the dart is laying down there. But that's not
important right now. Go up the stairs to the start of the bridge. Turn left and
you will see a gold room. You may want to look in the beetles before
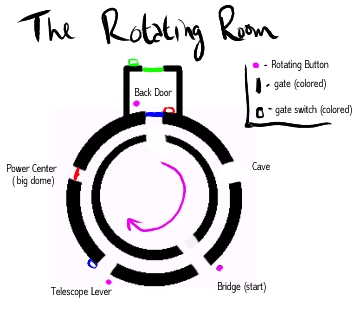
proceeding. The room has two doors and 5 passageways leading from it. The
button to the right of the entrance rotates the room. Hit the button 4 times
(you will see a cool animation 4 times) and you should be facing a dark wall
with a peephole. Turn around and continue to follow the stairs down the other
side of the hill. Turn left when you reach the end of the path and you should
see a locked gate. Go under the gate and through the cave. You should see
the gold room again with a passage leading to another cave through the room
and slightly left. If you do not see this, go back to the button to rotate the
room again. Continue to hit the button and then check the rotation in the cave
until you do.
Here is the illustration of the rotating room:
In the second cave there is a lever on a pipe. Turn it, these kinds of levers
power various items on the islands of riven. Most on the time by diverting
water or steam to the appropriate location Turn around and go to the doorway
of the room with the lever leading back into the gold room. You should see a
switch on your left, these types of switches open gates and doors. Flip it, do
not hit the rotation button, just the switch. Return to the first rotation button
and hit it 4 more times. You should now be facing a passage to the "Back
Door" (see diagram, this is a door, not a gate) across the gold room and
slightly right. Go to this door (you cannot open it right now), turn around, and
you should now flip the switch you see (looks a lot like the cave switch)
Again, do not hit the rotation button. Go back to the first rotation button and
hit it two more times. Now you should see the gold room with and passage
leading across a bridge across the room and slightly right. Now, go across
the bridge to the large domed building.
If you are stuck after reading all this refer to the diagram and you should get
an idea of the basic structure of the room and you should be able to get to
where you want to go. Follow the catwalk through the domed building until
you are outside again. Follow the catwalk outside until you come to a lever
and a pipe much like the one in the cave, flip this lever. Follow the catwalk
some more and you will find another lever similar to the first two. Flip this lever
in the similar manner. Return back the way you came to the button which
rotates the room. Hit the button 3 more times, this will help you later. Now
you can go away from the gold room across the bridge to the other section of
island. Go throught the door on the left midway through the tunnel. Sit it the
chair if you like, it doesn't do anything right now. Look around and find the red
and gold view portal. Hit the level next to the portal and continue down the
tunnel. Go through the room of pillars. (this room and the room with the chair
are important to the plot of the game, do you see any connections?) Leave by
way of the large door the switch near the view portal opened. Hit the blue
button to summon your transportation to the next island. Get in the transport.
Hit the lever on the left to turn around and the switch in the middle to go! This
is on of the best parts of the game, so enjoy.
Forest Island
Get out of your transport and go through the hole in the rocks. Go UP the
stairs to the chopped forest. Keep to the path of the right and you should find
a hold with a cart. Get in the cart, hit the lever and go! This is also one of my
favorite parts.
Paper Island
Not much time on the last island, this one is better. Climb down the ladder
and make your way out to the switch in the middle of the lake. Turn the lever
so it is in line with the middle pipe (toward bottom right of screen). Then head
for the cylindrical building. Go up the stairs on the side of the building. The
stair lead to a mess of switches and a window in to the building. Turn the big
wheel first. Then look left and switch the lever where the single pipe switches
into two. The white dot should be on the bottom pipe. Turn to the window
again and hit the switch on the right to the up position, then turn the lever on
the right to the up position also. Now you can enter the building. Go into the
building and down the ladder. The screen will get darker as you proceed. Just
keep clicking in the center until you see daylight. You will be treated to a nice
view as you exit the pipe. Follow the mountain pass over the fence to the
double doors. Go through the double doors, but shut them behind you. There
is a path on the right that will be revealed. Follow this path outside again and
look for a gray lever on the right of the bridge. Hit this lever and return to the
double doors. This time take the path you would have taken had you gone
straight throught the double doors. You should go up some stairs into the
cavern. When you get to the silver ball with holes in it, look up and climb
through the fan vent. This leads you into Ghen's laboratory. Cool huh? Read
the book on the table and find the five numbers in a row (refer to rivenese
number graphic) Write down this combination. Leave the lab through the door
with the blue button next to it. Hang a right out of the door and keep walking
on the VERY long bridge back to big dome island. Hit the lever to lower the
last section. Insert disk 2.
Big Dome Island 2
Again, follow the catwalk around the inside of the big dome until in ends. Turn
the wheel to raise the missing section. After crossing the raised section,
immediatly turn left and head out of the dome. A section of the bridge will be
missing. Turn around and hit the button to the right of the door. Turn back
around and continue on the bridge. Hit the switch to open the door and go up
the ramp to the grip.
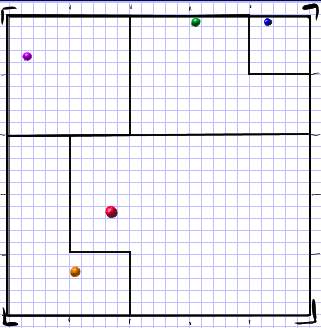
Place the marble in the grid as shown below :
Turn around and click the switch on the left wall. Pull the switch down and
push the white button it was covering. You will hear a noise, leave the switch
down. Go back down the stairs and back throught the Gold Room to the
Bridge and the first rotation button. Hit the button 3 times and go through the
gold room again back into the Big Dome. Follow the catwalk outside the
dome but stop right before the path goes through the rock. Turn right and hit
the button. You will be lowered. Turn around and go up the stair and along the
path to the spinning dome. Look throught the viewer and click the button on
top when the gold eye is showing. This may take a couple tries. The Dome
will stop and open. Go up to the dome and enter the code you learned from
the book in the laboratory. Open the book and touch the cool animated
picture.
Ghen's House
Your in a cage again. Turn around to find the button and push it. You will be
rewarded with a seven minute speech by Ghen on how he has changes his
ways (he hasn't, he's evil.) After his speech find the book with the most
blocks on it. Open it and touch the picture.
Tree Island
Back away from the linking book and hit the button on the floor. Turn around
from the sphere and go left up the stairs. Enter the little building and sit down.
Hit the lever on the left (nice view!), hit the lever on the right, and then the one
on the left again. Go out back down the path past the down and into the tree.
Pull the lever on the right and an elevator will take you down. Get out of the
elevator and push the switch on the left. You can now walk out of the fishes
mouth (another clue to the intentions of Ghen). Follow the path and you will
see a little kid. Follow her by taking the path on the right and up the stairs.
Go through the gate and hang another right. Keep following the path, the
villagers will always run from you. Go up the ladders to the houses and keep
going until you see and alter and a submarine type machine. Hit the lever next
to the submarine and go back to the gate you came through. Don't go back
through the gate, continue on the path and down the stairs (you should
recognize this area). You will see an animation of the penguin/dinosaur
looking sea creatures. As a side note, the longer you wait between moving,
the closer you can get to them. Stay on the path and you should come to
some ladders. Go down the ladders to the submarine. The lever that move in
an arc turns the submarine around, the lever that slides side to side
determines if the submarine will take the left track or the right track. The lever
on the right makes you move forward to the next junction.
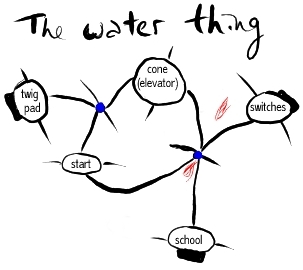
Here is the Map:
If you don't want to follow my directions here, all you need to do is go to the
switches, flip them all up, then to go the cone and get out - you can skip
down to the orange submarine (yellow doesn't show up well). If you do want
explicit directions, read on.. Turn around and go forward. Make sure the
sliding lever is on the right and go forward again. Open the hatch and climb
the ladders up to the switch building. Move all the levers to the up position
and go back to the submarine. Turn around, go forward, turn around, slide the
lever to the left, go forward. Get out of the submarine, go into the pyramid
and pull the triangle thing in front of you. Click on the seat that lowers. You
will see a prison, open the door by turning the crank on the right. Go into the
cell and open the drain of the floor. Touch the water and a passage will open.
Keep going down the dark tunnel until you reach the water. Screw in the light
on the left, turn around and go back down the tunnel slowly, turning on a light
in each frame, they are sometimes difficult to see. Once you reach the end,
turn around and go back down the tunnel. You will notice a door, open it and
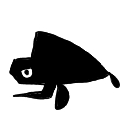
go through. Push down the stones you see in this order :
- Fish with a "C" on back

- Beetle
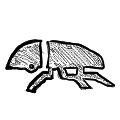
- Frog
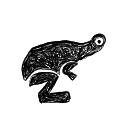
- Platypus or Duck
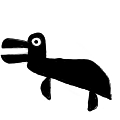
- Black Fish
Rebel Island
Touch the book that comes out. You will get a nice view on the rebel base,
the only nighttime shot in Riven. Turn around and head for the book. You'll get
darted. Wander around your cell for a bit and enjoy the view out the window
and the door. Eventually a lady will come in and give you Catherine's journal
and the prison book you lost in the beginning. Look through the journal for a
series of five numbers. You will need these later. The lady will return with a
linking book for you to go through.
Tree Island 2
You will return to the room with the stones. Go back down the tunnel and pull the wire to open the passage back to the cell. Exit the cell and go right. Lower the ladder and go down it. Turn around and go back the way you came after lowering the submarine. Except, stop were all the tree are cut down and take the mine car ride again. (This is cool anyway). Remember where those double doors were? Go there. Except, close the doors behind you and go left this time. Go down the stair to the door. Open this door, go through, and close it behind you. Go down the tunnel that was behind the door and open the spinning dome by clicking on the gold eye. Enter the same password to get to the book and link back to Ghen's house.
Ghen's House 2
You'll talk to Ghen again. Go through the back when he askes you to, he will
take your place when he goes through. After capturing Ghen, find the hole in
the floor and go down. There in a silver thing on his dresser. It makes five
sound in a row, either a ding, a clank, or a creak. Write these down. Go back
up the ladder and pull the handle just clockwise of the hole. Then go and click
on the book with the least blocks.
Catherine's Island
Once away from the dome follow the path to the end. You will see three
buttons. Each make the same noise as the silver thing in Ghen's House.
Push the right buttons in the right order and move the lever on top on the
buttons. Catherine will talk to you and run off. Go back to the dome and link
back to Ghen's house. At Ghen's house go through the book with five blocks.
Big Dome Island 3
Once out of the dome follow the path to the end. Hit the button, get on the
platform, and hit the button again. Turn right once at the top and follow the
path outside and then through the building. When you reach the door, lower
the bridge with the lever and go across. Go through the gold room and out the
other side. Take a right down the stairs to where you began. Go to the
telescope thing and look down at the manhole cover. Enter the combination
from Catherine's journal and pull the handle to open it. Remove the stop from
the left support column and flip the lever on the right down and hit the button
to lower the telescope as far as it will go. Oops! Then watch the fun, you've
won!
References
Letters
- From: MORTAL8983@aol.com
WHY OR WHEN ARE U GONA GET THE WALKTHROUGH FOR """ RIVEN """ ???
AND WHY DONT U HAVE ANY WALKTHROUGHS FOR JEWEL OF THE ORACAL OR JEWELS 2,,,
CAUSE I HAVE THEM NEED HELP...
THANKS ALOT ROB
- From: Fredrik Hildebrand, Sent: Saturday, December 18, 1999 2:02 PM
Subject: the riven walkthrough: did you know that all the pictures in your walkthrough are broken? at least they are for me, and I find it pretty distubing since you time after time say that you should look at this and that picture. I'm relly stuck, and this is a great walkthrough, besides from the fact that the pictures are broken. I would be very pleased if you could fix this.
Fredrik Hildebrand/Sweden
Please send us your comments and suggestions.

FastCounter by bcentral


